Over 2.5 million people visit Bryce Canyon National Park each year, drawn by its vibrant rock formations called hoodoos and the endless chances for stunning photos. This high desert landscape in Utah features towering spires and deep red cliffs that make every sunrise and sunset feel magical. In this post, we’ll explore Bryce Canyon National Park most instagrammable spots and share tips on capturing each location at its best. Whether you’re traveling solo, with a friend, or with family (plus a beagle, like we do at Kango Anywhere), you’ll find plenty of angles to fill your camera roll.
1. Sunrise Point
Sunrise Point offers a gentle introduction to Bryce Canyon’s natural amphitheaters.
- Perfect spot for early morning light
- Easy access from the main parking area
- Wide viewpoint for panoramic shots
- Ideal for beginners and families
Sunrise Point is often the first place people head to when they arrive in Bryce Canyon National Park. Many visitors gather before dawn to watch the sky shift from purple to pink, then erupt into a warm orange glow against the hoodoos below. Short morning shadows and golden light create a dreamy effect on the unique limestone spires.
For an effortless photo session, arrive about 30 minutes before sunrise. Dress warmly, as the high elevation can make mornings chilly, even in late spring or summer. If you’re traveling with kids, the short, paved path from the parking area to the overlook keeps it manageable for strollers or toddlers. For those bringing a dog, note that Bryce Canyon has specific pet rules. Leashed pets can be on paved lookouts like this one. For details, take a look at our Exploring Bryce Canyon National Park with Your Dog post, where we discuss how to navigate these regulations.
Below is a quick table with basic info you might need:
| Feature | Details |
|---|---|
| Access | Paved walkway from parking |
| Best Time | 30 minutes before sunrise |
| Nearby Facilities | Restrooms, water refill at Visitor Center |
| Photo Tip | Low-angle shots to frame hoodoos against sky |
To make your photos pop, try focusing on the hoodoos in the foreground while capturing the pastel sky in the background. You can use the natural lines of the amphitheater to guide the viewer’s eye across the landscape. Even if you’re just snapping pictures on a phone, a few quick manual adjustments—like lowering the exposure or using night mode—can create vivid contrasts.

Sunrise Point Lookout at Bryce Canyon National Park Rim Trail
2. Sunset Point
Sunset Point presents a dramatic view of Bryce Canyon’s amphitheater at dusk.
- Sweeping overlook perfect for end-of-day photography
- Rich orange and red tones under evening light
- Ideal for capturing long shadows among hoodoos
- Often busier in the summer season
Sunset Point draws crowds, but for a good reason. The low-angle light in the late afternoon paints hoodoos with striking shades of orange, highlighting their layered shapes. Many photographers set up tripods to capture timelapse scenes of the sun dipping below the horizon. Others simply walk the rim for a series of quick but impressive snapshots. If you plan on an extended photo session, aim to arrive at least one hour before sunset. That gives you plenty of time to stake out the best vantage point and watch how the scene evolves.
Quick bullet points to keep in mind:
- Parking: It can fill up quickly during peak season, so you might want to use the park’s shuttle if available.
- Safety: Stick to designated overlooks. The canyon edge can be unstable if you step off-trail.
- Equipment: A simple zoom lens or your phone’s portrait mode can help highlight hoodoo details.
If you want to extend your stay, the Rim Trail connects Sunset Point and Sunrise Point, making a scenic sunset walk possible. For more multi-day itinerary ideas in Utah’s national parks, check out our A Week Exploring the “Big 5” National Parks in Utah guide, where we cover travel logistics and lodging options in the region.

Stunning Sunset at Bryce Canyon National Park’s Sunrise Point Rim Trail
When the sun finally drops, twilight gradually takes over, and a purple glow can fill the sky. If you bring a tripod, you can capture the changing colors in long-exposure shots. Just remember to switch off any autofocus assist lights or beeping sounds to keep the environment peaceful.
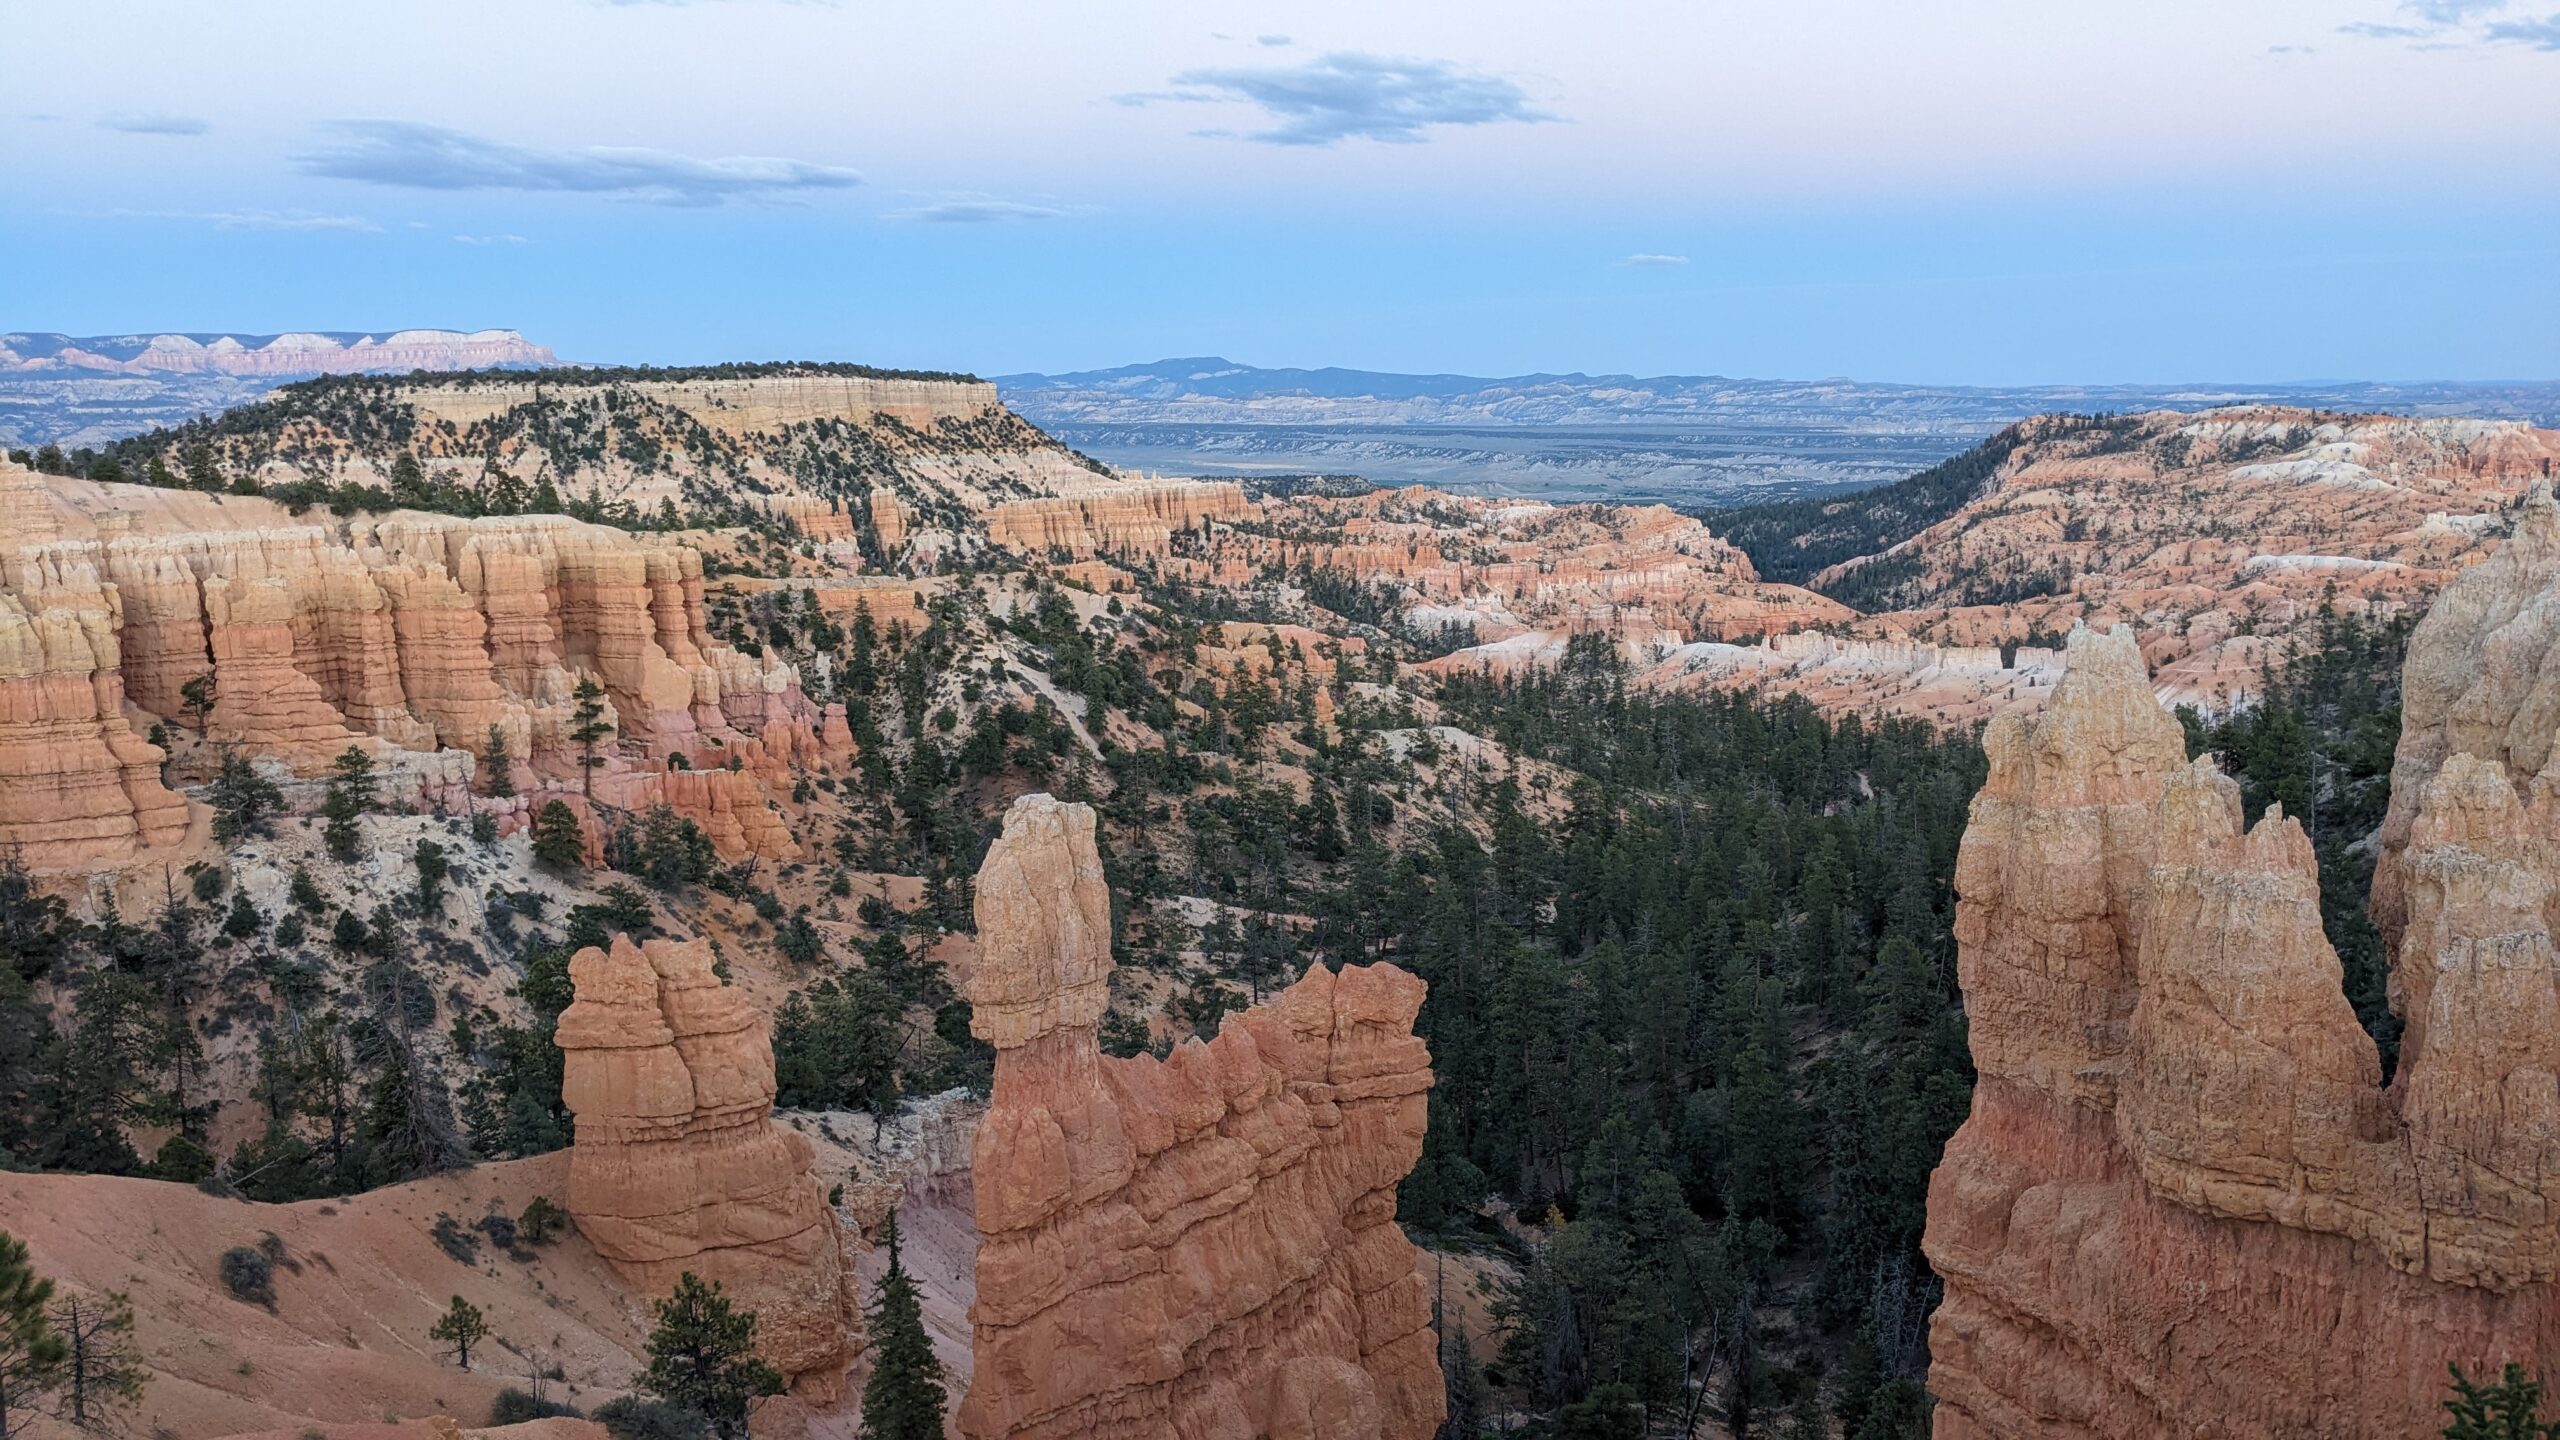
3. Bryce Point
Bryce Point offers a high-elevation vantage that feels expansive.
- Panoramic view of the main amphitheater
- Photogenic at sunrise, but also great all day
- Access via a short path from the parking lot
- Possible wildlife sightings, like deer or ravens
Bryce Point is one of the park’s most elevated overlooks, allowing you to see the sweeping amphitheater from a spectacular angle. While Sunrise Point and Sunset Point are more famous, many photographers prefer Bryce Point for its diverse layers of color and the near-bird’s-eye perspective. The hoodoos below often look tiny from this height, which can make for unique compositions.
Benefits of visiting Bryce Point:
- Fewer Crowds: It sometimes draws fewer people than the more central overlooks.
- Landscape Variety: You can include tall hoodoos in the foreground and the sprawling canyon in the distance.
- Golden Hour Flexibility: Whether morning or evening, the angle of the sun can create dramatic shadows across the valley.
If you’re interested in how other parks compare, our Exploring Badlands National Park in South Dakota post outlines a different style of geological scenery. By comparing Bryce Canyon to locations like the Badlands, you see how each region’s rock formations shape your photo opportunities.

Bryce Canyon National Park – Sniffy the Beagle at Bryce Point
When framing shots at Bryce Point, consider using the foreground elements like fences or trees to add depth. Standing near the rail and looking slightly downward can help capture the sense of scale between you and the valley below. Keep in mind that weather can shift quickly at high elevations, so a jacket is a good idea even in warmer months.
4. Inspiration Point
Inspiration Point features several tiers of overlooks for truly scenic angles.
- Three main vantage points to explore
- Steep, unpaved pathways that require caution
- Large clusters of hoodoos known as Silent City
- Incredible place to experiment with different focal lengths
Inspiration Point lives up to its name by giving you a multi-layered view of Bryce Canyon National Park. The first overlook is the easiest to reach, while the upper overlooks involve a short but steep climb. Each tier unveils a fresh perspective on the hoodoos below, so taking your time can pay off with a variety of shots.
What to remember:
- Footwear: Wear stable shoes, especially if you plan to climb to the upper overlooks.
- Children and Pets: Keep them close, as some areas along the path are quite steep.
- Peak Light: Early morning or late afternoon can bring out shadows and highlight the rock textures.
For reference, Inspiration Point is near the heart of Bryce Canyon, so it’s easily accessible by car or shuttle. If you’re curious about visiting multiple national parks in one trip, read our Guide to Zion National Park in Utah to see how you can combine Bryce Canyon and Zion in a single road trip.

Stunning View of Bryce Canyon National Park
While at Inspiration Point, be mindful of the sun’s angle. If you arrive close to noon, direct overhead light can flatten your images. Try shooting from a low angle or using some partial shade to create depth. This vantage also works well for panoramic shots, which can capture a wide sweep of hoodoos and the sky above.
5. Fairyland Point
Fairyland Point is a quieter location with a whimsical name that fits the scenery.
- Less crowded than other major overlooks
- Soft morning light that illuminates hoodoos gently
- Access to Fairyland Loop Trail if you want to hike further
- Good spot for a calm picnic with scenic views
Fairyland Point sits a bit outside the main park road, so it’s often overlooked by hurried visitors. That means you’ll typically find fewer people, offering a more peaceful atmosphere. The rock formations here are just as remarkable, featuring colorful bands of limestone, sandstone, and mudstone that catch the sunlight in subtle ways.
Highlights of Fairyland Point:
- Gentle Sunrise: Light creeps slowly over the hoodoos, creating pastel tones.
- Less Noise: Perfect for travelers seeking a calmer photography experience.
- Nearby Trail: The Fairyland Loop Trail extends around 8 miles, if you’re up for a moderate hike.
If you decide to hike, bring plenty of water and sun protection. The trail has some elevation changes, so it’s a moderate challenge. Alternatively, you can drive up, take your photos, and continue exploring. For those who like early starts, a quick sunrise shoot here offers a relaxing moment before heading to busier overlooks. You can then compare your shots to the ones at Sunrise or Sunset Points.

Sunrise Hike at Bryce Canyon National Park Rim Trail
If you’re fascinated by hoodoos, you might also like reading about geological formations in other parks, like the spires found in North Cascades National Park in the Springtime. That post highlights how landscapes differ across the country, giving you even more photo inspiration.
6. Navajo Loop Trail (Thor’s Hammer)
Navajo Loop Trail brings you face-to-face with Bryce Canyon’s iconic Thor’s Hammer.
- Short but steep trail into the canyon
- Thor’s Hammer: a popular, towering hoodoo
- Great for dramatic angles from below the rim
- Midday light can be harsh, so plan accordingly
Navajo Loop Trail is about 1.3 miles, yet it packs a punch with its switchbacks and steep descents. The reward is seeing the hoodoos from the bottom up, which gives a whole new perspective. Thor’s Hammer, one of Bryce Canyon’s most famous formations, stands tall near the trail. Many photographers frame Thor’s Hammer against the bright sky for a powerful shot.
Trail Essentials:
- Difficulty: Moderate; the return climb can be tiring.
- Time of Day: Early morning or late afternoon for softer light.
- Safety: Watch your step on the switchbacks, especially if they’re icy.
If you’re hiking with your dog, note that pets aren’t allowed on unpaved trails in Bryce Canyon. You can still capture scenic overlooks with your furry companion at the Rim Trail. For more dog-friendly national park recommendations, see our Exploring Yellowstone National Park: A Dog-Friendly Adventure article, which covers how certain parks handle canine visitors.

Stunning Bryce Canyon National Park Navajo Loop Switchback
For the best photos of Thor’s Hammer, look for interesting angles that include the canyon walls behind it. You can also shoot upward to emphasize its height. If you’re short on time or energy, consider hiking down Wall Street (one branch of Navajo Loop) and then returning the same way. Wall Street’s towering rock fins add another photogenic element to your trip.
7 + 8. Queen’s Garden Trail and Tower Bridge
The Queen’s Garden Trail unveils hoodoos that appear like royal figures, while Tower Bridge stands as a dramatic rock formation resembling a castle gate.
- Gentle descent into the canyon with fairly easy gradients
- Tower Bridge area off a spur trail for unique photo ops
- Blends well with the Navajo Loop for a Figure-8 route
- Family-friendly for those who want a milder hiking challenge
Queen’s Garden Trail meanders around some hoodoos that look like they could be statues in a royal courtyard. The name comes from a formation believed to resemble a British queen’s profile. Nearby, the Tower Bridge formation is another highlight: a striking arch that brings to mind a medieval fortress. It’s especially rewarding if you like variety in your shots—scenic arches, tall spires, and twisting trails.
Things to know:
- Combined Routes: Many hikers link Queen’s Garden with Navajo Loop for a longer but scenic route.
- Shade: There’s minimal shade in the canyon, so bring a hat or umbrella in hotter months.
- Photo Styles: Mix wide shots of the canyon with close-ups of hoodoos to capture textures.
If you have extra time, you can incorporate side angles that highlight both the arch and the spires around it. Stepping a few feet off the main path (while remaining on safe ground) can yield a cleaner composition. For more insight into places where geology and history intersect, consider reading about Pinnacles National Park: A Journey Through Time, Politics, and Preservation, which also offers fascinating rock formations.

Morning Hike in Queens Gardens Trail and Navajo Loop at Bryce Canyon National Park
The trail can be about 1.8 miles one way, making it one of the more accessible ways to explore below the canyon rim. Always keep track of your energy levels, especially if you plan to ascend via the Navajo Loop switchbacks. A combination of these two trails forms a roughly 3-mile loop, which many photographers claim is the most photogenic part of the park.
9 +10. Rainbow Point and Peek-a-boo Loop
Rainbow Point showcases wide vistas and the highest elevation in the park, while Peek-a-boo Loop provides an immersive hike among the hoodoos.
- Rainbow Point stands at around 9,100 feet elevation
- Peek-a-boo Loop is roughly 5.5 miles with moderate difficulty
- Fewer people visit these spots compared to the main amphitheater
- Incredible angles for capturing layers of rock and colorful strata
Rainbow Point is at the southern end of Bryce Canyon National Park. From there, you can look north across the entire stretch of hoodoos. The viewpoint sign might show you an elevation of around 9,000 feet, which contributes to cooler temperatures and occasionally patchy snow in the shoulder seasons. A short walk away, you’ll find Bristlecone Loop, a trail that winds through ancient bristlecone pines that can be thousands of years old.
If you’re seeking an in-depth experience, tackle Peek-a-boo Loop. This moderate trail connects with other routes like Navajo Loop and Queen’s Garden, making it perfect for a half-day adventure. The path goes up and down through sections of hoodoos, offering changing perspectives that most casual visitors miss.
Key details:
- Altitude Caution: You may feel the elevation’s impact if you’re not acclimated.
- Trail Markers: Peek-a-boo Loop is well-marked, but always carry a map or park guide.
- Photography: Mid-hike vantage points reveal hoodoos from various angles, perfect for dynamic shots.
If you want to compare Bryce Canyon’s southern region to the scenic drives in other parks, you might enjoy our Navigating US National Parks Road Closures in Spring article. It discusses how seasonal changes affect travel plans, which is especially helpful if you’re unsure about road conditions near Rainbow Point in early or late seasons.

Stunning Rainbow Point View at Bryce Canyon National Park
Plan your visit to Rainbow Point early in the day if you want fewer crowds. You’ll likely have more space for uninterrupted photography. Also, keep an eye on approaching weather—summer thunderstorms can roll in quickly at higher elevations. While they can create dramatic skies, you’ll want to be cautious about lightning risk in open areas.
FAQ
1. Can I bring a tripod to Bryce Canyon National Park?
Yes. Tripods are permitted and can help you capture sharp, long-exposure shots at sunrise or sunset.
2. Is there a best season for photography at Bryce Canyon?
Each season has its charm. Winter snow adds a white contrast to the red hoodoos, while summer offers vivid sunrises and sunsets. Spring and fall typically have fewer crowds.
3. Are drones allowed for aerial photos?
No. Drones are generally prohibited in U.S. national parks. For details, see our post on Why Does the US National Park Service Hate My Dog and Drone?.
4. How can I avoid crowds at popular overlooks like Sunrise Point or Sunset Point?
Arrive early or visit during the off-season (late fall or winter). Using the park’s shuttle can also help you reach overlooks more efficiently.
5. Is Bryce Canyon suitable for a short day trip?
Yes. You can see several overlooks in one day, but consider staying longer to explore a trail. Even short hikes offer unique photo angles.
6. Are there good spots to photograph wildlife?
Keep an eye out near forested sections or at dawn and dusk. Mule deer and various bird species often appear along the rim. Maintain distance to keep animals safe and undisturbed.
Bryce Canyon National Park is a photographer’s dream, with each overlook and trail offering a new perspective on its colorful hoodoos. Whether you’re hitting the popular viewpoints or exploring hidden trails, the park delivers memorable shots. We hope you use these tips to track down Bryce Canyon National Park most instagrammable spots and return with a memory card full of epic landscapes. Feel free to share your best captures or any new angles you discover with the Kango Anywhere community!
Details with Google Maps Links & Camera Settings
Bryce Canyon National Park is known for its awe-inspiring hoodoos, sweeping vistas, and vibrant colors that shift dramatically with the changing light. For those seeking the most Instagrammable spots, there are some must-see locations as well as lesser-known gems. Here are the top 10 locations for your Instagram feed, complete with the best time of day to shoot and suggested camera settings.
1. Sunrise Point
As its name suggests, Sunrise Point offers a spectacular view of the first light hitting the canyon’s hoodoos. This is a top spot for capturing the early morning glow over Bryce.
- Best time: Sunrise
- Camera settings:
- Aperture: f/8 to f/11
- Shutter speed: 1/60 to 1/100 sec
- ISO: 100-200
- Lens: 24-70mm
- Tip: Use a tripod for long exposures as the sun rises to capture the soft, glowing colors.
2. Bryce Amphitheater
Bryce Amphitheater offers one of the most iconic views of the park. Thousands of hoodoos stretch across the landscape, offering endless photo opportunities.
- Best time: Late afternoon or sunrise
- Camera settings:
- Aperture: f/11 to f/16
- Shutter speed: 1/125 sec
- ISO: 100-400
- Lens: 24-70mm
- Tip: A polarizing filter can enhance colors, especially during mid-day.
3. Thor’s Hammer
Thor’s Hammer is a massive hoodoo that stands out due to its unique shape. It’s a favorite for close-up shots with the towering rock formations in the background.
- Best time: Mid-morning or late afternoon
- Camera settings:
- Aperture: f/5.6 to f/8
- Shutter speed: 1/250 sec
- ISO: 100-200
- Lens: 70-200mm
- Tip: Capture this with contrasting light during the golden hour.
4. Sunset Point
With panoramic views and vibrant red rocks, Sunset Point is aptly named for its stunning sunset views. Capture the warm colors of the canyon as the sun sets.
- Best time: Late afternoon to sunset
- Camera settings:
- Aperture: f/8 to f/11
- Shutter speed: 1/125 to 1/60 sec
- ISO: 100-400
- Lens: 24-70mm
- Tip: Stay after sunset for some beautiful post-sunset colors.
5. The Navajo Loop Trail – Wall Street Section
This narrow passageway, framed by towering cliffs, offers one of the most unique Instagram opportunities. The way light filters through the rock formations creates a magical atmosphere.
- Best time: Mid-morning or late afternoon
- Camera settings:
- Aperture: f/5.6 to f/8
- Shutter speed: 1/100 sec
- ISO: 400-800
- Lens: 16-35mm
- Tip: Vertical shots will highlight the sheer height of the cliffs.
6. Inspiration Point
Inspiration Point offers a higher vantage point over the Bryce Amphitheater, allowing for a more expansive view of the hoodoos below.
- Best time: Sunrise or sunset
- Camera settings:
- Aperture: f/8 to f/11
- Shutter speed: 1/100 to 1/125 sec
- ISO: 100-200
- Lens: 16-35mm or 24-70mm
- Tip: Use a wide-angle lens to capture the expansive view of the canyon below.
7. Natural Bridge
One of the park’s rare natural arches, Natural Bridge is an excellent spot for capturing the unique beauty of Bryce. The arch frames the landscape beyond, offering a unique composition.
- Best time: Early morning or late afternoon
- Camera settings:
- Aperture: f/5.6 to f/8
- Shutter speed: 1/125 sec
- ISO: 100
- Lens: 24-70mm
- Tip: Try framing the shot with the arch in the foreground and the landscape beyond.
8. Bryce Point
Bryce Point offers one of the highest vantage points in the park, providing sweeping views of the hoodoos and colorful rock formations.
- Best time: Sunrise for golden-hour light
- Camera settings:
- Aperture: f/8 to f/16
- Shutter speed: 1/60 to 1/100 sec
- ISO: 100-200
- Lens: 16-35mm
- Tip: Get there early to avoid crowds and catch the best light.
9. Mossy Cave
A hidden gem, Mossy Cave is less visited but offers a small waterfall and lush greenery, creating a contrast with the otherwise arid landscape of Bryce Canyon.
- Best time: Mid-day for even light
- Camera settings:
- Aperture: f/4 to f/5.6
- Shutter speed: 1/60 sec
- ISO: 200
- Lens: 24-70mm
- Tip: Capture the waterfall with a slower shutter speed to create a soft, silky effect.
10. Paria View
Paria View is lesser-known, making it a quieter location with views similar to Bryce Point. It’s a great spot for sunset shots, as the sun sets behind the hoodoos, casting a warm glow over the landscape.
- Best time: Sunset
- Camera settings:
- Aperture: f/8 to f/11
- Shutter speed: 1/125 to 1/60 sec
- ISO: 100-200
- Lens: 16-35mm or 24-70mm
- Tip: Arrive early to catch the best sunset light and use a polarizer to enhance the colors of the rocks.
Additional Tips for Photography in Bryce Canyon:
- Golden Hour Advantage: Early morning and late afternoon provide the best lighting for capturing Bryce’s vibrant colors. The warm, golden light highlights the red and orange hues of the rock formations, giving your photos a magical quality.
- Polarizing Filter: This helps reduce glare and bring out the vivid colors of the rock and sky, especially useful in mid-day light.
- Tripod: For sunrise and sunset shots, use a tripod to stabilize your camera and reduce shake during long exposures.
- Composition: Bryce Canyon offers natural lines and textures with the hoodoos and rock formations. Use these elements to create leading lines and depth in your photos.
- Off-the-Beaten-Path Spots: For a unique shot that not everyone has, consider visiting Mossy Cave or Paria View, which are less frequented by tourists but offer equally stunning views.
Bryce Canyon’s unique rock formations and ever-changing light make it a dream for Instagram enthusiasts. With these top 10 locations, you’ll be sure to capture stunning photos that will stand out on your feed, from the iconic views to hidden gems. Plan your visit with the right time of day in mind and the perfect camera settings to make the most of this incredible national park.